
How it Started and How it's Going: The Booth
- Michael Apollo Lira
- Nov 22, 2021
- 9 min read
It's said that the most important part of your audio's quality comes from your recording environment. Any voice over artist worth their weight in salt has, through either ingenuity, monetary means, or a combination of both, figured out a way to acoustically make the most of the space they have to work with in order to record quality, competitive audio. On a not-as-related note - is salt even worth that much anymore?
You may hear varying values assigned to mic quality vs. environment, but the consensus is that your recording environment outweighs your mic as far as importance in quality goes. The reason being, it's a bit moot having the best mic in the world if you are recording from an untreated space. That amazing mic is going to hear every reverberate echo, every car passing by outside, every airplane passing overhead, every dog barking, and every toddler that's been taped to a wall and left to kick and scream all day.
A good mic is moot in the presence of an untreated or noisy space.
Conversely, if you have a very well treated space and a mid-grade or starting mic, you will still be able to produce some competitive quality recordings and audio, provided that you yourself have good mic technique, have had coaching, and otherwise know what you're doing.
If we could make a food pyramid out of your priorities, I would put recording environment at the base, followed by skill / technique, then topped with mic quality.
So having said all that - we ALL start somewhere!
...you wanna see what how it started for me?

Ohh yes. This homemade bad boy. When you first start your journey into the world of Voice Acting, Google is going to pull you in a lot of strange directions that contain strange advice from strange people. Now, these strange people are not to be confused with the strange people who give good advice in the world of voice over, ok? These are different strange people.
Yeah, I know. That's confusing. It gets better with time, I promise. You'll learn to distinguish noise from wisdom. It takes time.
So - being new, naive, eager, and hungry to jump in, I found some YouTube tutorials on how to make small voice isolation boxes! Free space is not something I have a great deal of in my narrow, tall town-home. So one of these seemed to be perfect for my circumstances!
Here is a list of what I acquired for this starter project:
A wooden crate - Lowe's
Carpet Padding (that chunky looking layer of foamy mish-mash stuff) - Lowe's
Adhesive Spray - Lowe's
2-inch "accoustic foam" - Amazon (please be aware this is simple foam. More professional-grade acoustic foam is more dense and you will find from more reputable acoustic-related sites.
And I proudly created this monstrosity. It unfolded, too! I made a space in the center for my Apogee Mic+ to sit, and I eagerly took this baby for a spin with some auditions for Casting Call Club. I created a setup on my kitchen's dining table, laptop next to it, and took it all for a spin with my earbuds.
And I discovered some things that day:
My kitchen produces a lot of reverb.
I live under a flight path. Guess it took a mic for me to notice!
My voice sounded boxy, unironically (I mean...I was recording in a box)
The YouTube tutorial did not seem to deliver a very good product.
Snake oil!! Why does this box not isolate like the YouTube video said it would?
I guess because sound is a complex phenomenon in the world of physics. Sound reflects, travels, bounces, ricochets...it's diffused by irregular, absorbent surfaces and seems to deflect from smooth, solid surfaces. Sound is energy! Check out what happens when you fire sound in the Super Nintendo game Mega Man 7!

Yeah it bounces back at you off those walls, hits you, and that energy charges you up. Sweeeet.
So after playing around with that first setup, this was clearly going to be turning into something much bigger. It seemed I needed a bigger space. Something more enclosed and more isolated than a half-open box. Something a little less interested in welcoming not just my own voice but the sound of EVERYTHING ELSE AROUND ME...including the tearing down of the haunted house that resided directly behind my home. Lots of construction going on during those times.
I continued to read up on my options. There was the most obvious solution that people raved about - things like StudioBricks. Those sounded AMAZING. And it would likely solve ALL of my problems (not just in the world of voice over).
But after doing some research, I came across two problems:
These apparently cost something in the neighborhood of $7,500 to $13,000 - which would result in a solid maiming by my houseboss, and
THEY WEIGH OVER 10,000 LBS. YEAH.
My office, where I was now interested in using as a space for voiceover, lives on the 2nd floor of my home and I really don't need to find out if it can accommodate that weight. I sleep directly beneath that space, one floor below. I know I'd be awake at night, staring at the ceiling, waiting for the moment when everything comes crashing down on me. And while staring at the ceiling, I know my mind would wander and start thinking things like "I wonder what the newspaper would say.."
I just don't need that in my life.
So the most reasonable compromise I could think of would be to try clearing out half of the office's small closet space and purpose it for voice acting.
For round 2, I turned back to Amazon, where I had previously purchased the 2-inch acoustic foam. The plan would be to surround myself with this foam! Since I was using only half of a closet, I'd need a simple, faux wall to divide the closet with - a trip to Home Depot was in the cards. So up went a simple particle-board divider, and then with the remaining space, I um... spray-glued a couple hundred dollars worth of the acoustic foam to every available surface. It pretty much smelled exactly how you'd expect it to smell after doing something like that.
When all was said and done, I had a space not unlike that of a small phone booth to work with. Because there was a large storage bracket at the top of the closet above my head, I needed to use a small stool to sit on while I recorded. I upgraded my mic to an AT4040 and suspended it from the storage bracket above, and would sit on the tiny stool - back against the foam behind me, knees against the foam in front of me, laptop in my lap, and I would slide the closet door closed to record.

If I moved, the mic would pick up the sound of the foam rubbing against me. If my laptop's fan kicked into high gear, the mic would pick it up. If a plane flew overhead outside, the mic would pick it up. BUT! If I held perfectly still, and no airplanes were above me, and my laptop wasn't heating up, I could record!
And so this was how it would be for a period of time. During this time, I would spend my days off of work at the hospital crammed into this tiny, dark closet space, recording auditions for my newly acquired P2P membership. The only light was from my laptop's screen. I would send out about 300 auditions during the course of my P2P membership, and from that I would book 1 job. I would receive 1 other job through personal networking.
That single client's feedback from the P2P gig? "Hey, you sound kind of boxy - can you fix that maybe?"
Sure! uhhh....no problem!
(I had no idea what to do about that)
I thought I was in an acoustically treated space!
Ongoing YouTube rabbit holes about physics and sound would eventually lead me to discover that two things were working against me pretty strongly in that space. First, the foam that I was using did not really have much density to it, so it could not do much to and diffuse reverberations from lower frequency sounds (ie - the bass in my voice). So those became more prominent and reflective while the other frequencies behind my voice were absorbed a little more readily by the foam. This would become much more noticeable if I added any real volume to my voice. Second, the space was WAY too small.
Acoustics do not like small, enclosed spaces. Sound reflects and bounces around much more-so with closer surfaces. While this was an upgrade from that tiny wooden crate I had previously tried using, things STILL sounded boxy. Sound needs space. And plus - all that foam in such a confined space made things get really hot, really quickly. Too many times I found myself a sweaty mess while recording.
I let my P2P membership lapse that year while I evaluated just how to better tackle this issue. I had joined The Global Voiceover Artists Network run by Superhuman Joshua Alexander to meet others, grow, and learn. Through the GVAN, I was paired up with mentor Mike McGonegal who had extensive knowledge in acoustics and the technical side of sound treatment. The difficult conclusion I eventually came to? I was going to need to use the entire closet (which was not very big in the first place) if I really wanted a decent recording space. Which meant my beloved soap making supplies taking up the other half of the closet were going to need to go into storage.
So out came EVERYTHING from the closet. I also removed the storage bracket in addition to the acoustic foam that had been spray-glued onto the walls (yeah, guess who didn't think that far ahead?). Off with the moulding. Oh - not you, carpet - you can stay. You're cool.
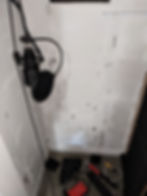
This is what a lack of foresight looks like
And then the big purchase: Owens Corning 703 4-inch thick Semi-Rigid Acoustic Fiberglass Insulation. THIS stuff was designed with sound in mind.
I measured the closet's dimensions, and based on that, I ordered a few hundred dollars of these insulation panels. It seems that they are only made on the East Coast, so having them shipped across the US cost a couple hundred bucks as well. Oh sweet baby J this better work.
Then came the trips to the fabric stores.

BECAUSE YOU CAN'T JUST HANG OUT WITH FIBERGLASS INSULATION LIKE IT'S SOMETHING TO DO.
I purchased a few hundred feet of fabric to wrap and seal each individual insulation panel with...and they actually looked pretty nice when all was said and done!

IF YOU WANT TO DO A PROJECT LIKE THIS, YOU *NEED* *NEED* *NEED* TO WEAR PERSONAL PROTECTIVE EQUIPMENT (PPE). YOU WILL REQUIRE EYE PROTECTION, GLOVES, AND A MASK TO PROTECT YOUR AIRWAY. YOU DO NOT WANT FIBERGLASS IN YOUR BODY.


I cut some of the panels to accommodate the measured closet dimensions, and essentially made a giant fort out of these panels. Because they were such a snug fit, they required little to no additional support. But as a safety measure, I did line the recording space with sort of a framework of PVC pipes to maintain and support everything. I then lined everything with a simple grey curtain from Ikea for a more uniform and clean appearance.

I then created a workstation within the space out of additional PVC piping - something to support a monitor, keyboard, and mouse, as well as light storage for my voice over supplies. After that was created, I lined the space with LED strip-lights - with the additional option for mood lighting!


The lighting is good enough that I can also send out well lit video auditions as well
With all said and done, there is a LOT more room in that thickly padded space to comfortably stand, sit, and work. And the quality of what's recorded in that space sounds quite good. Any further upgrades beyond this point would involve construction projects, I suspect. And in honor of the mentoring I received from Mike McGonegal in preparation of this enormous labor of love, I have named my recording booth The McGonegal Mk1! Future iterations of course will be named The McGonegal Mk2, Mk3, etc.
Once The McGonegal Mk1 was finished, I renewed my P2P membership to give things another try... and noticed a small improvement in my audition stats. The auditions that were being heard were being liked a little bit more.
I then decided to get some 1 on 1 coaching with Scott Burns. My audition statistics once again saw an immediate improvement, and I've started booking more work since then.
And so there you have it! Your voice over food pyramid!
Environment first, technique/skill second, mic third.
And you can argue that if you want. It's just one thought on the matter.
Everybody's journey of trial, error, growth, and learning is going to be different and unique. This story is simply mine. Yours is going to be different, and marked by your own brand and style of what worked and what didn't. Many people are further in their journey than where I am right now, and they are using a recording setup that is built from PVC pipes and moving blankets. This is ok! Because we aren't here to compare how fancy one thing is over the other. We are here to cheer for each other and celebrate success. If there is one thing the world of voiceover deserves commendation for, it is its sense of community.
What's most important at the end of the day is that you're doing what works for who you are, where you are, and what you need to accomplish. And so long as you're working hard and doing what you can to put your best foot forward, you deserve all the success that's out there!
#Voiceover #Studio #booth #StudioBricks #Growth #Story #Seattle #MichaelApolloLira #ScottBurns #JoshuaAlexander #OC703 #VoiceActor #Microphone #Coaching